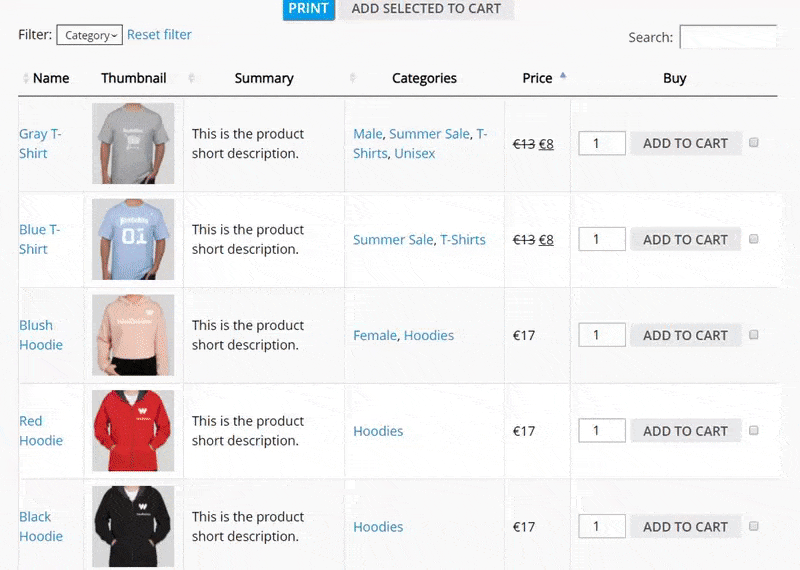
Product Table WooCommerce plugin allows listing your WooCommerce products in a searchable table layout with filters. It’s hugely popular for quick order forms, large product catalogs, restaurant order systems, wholesale layouts, price lists, and more.
Display items in a responsive table, generated automatically, with full control over what’s displayed with no coding required. The WooCommerce product table allows you to add product tables anywhere on your site. To list products in a table, just add them to the table with the help of a sortable and searchable form, select the product properties you would like to display as columns, and add a table on any page via a shortcode.
Product Table Features
Any content support
The plugin fully supports Name, Thumbnails, Categories, Tags, Featured, Sales, Price, Date, SKU, Rating, Stock status and Stock quantity, Attributes, Summary, Short description, Product link, Downloads, Buy button, Custom fields, and taxonomies
Add products automatically in one click In case if you add items using the “Add automatically” option, you won’t need to edit tables: all the new products you add to your shop will be automatically added to the table according to the selected category.
Table elements
Customize each element in a product table: Caption, Header, Footer, Signature, Fixed Header, Description.
Product table with variations
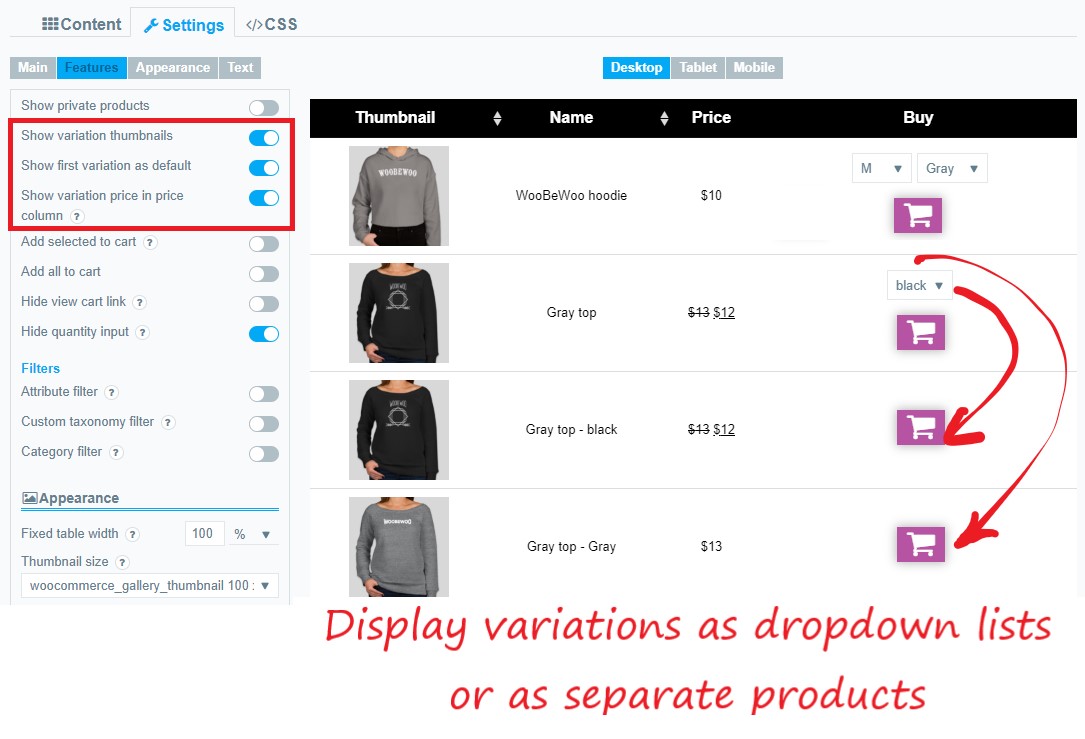
The plugin fully supports variable products. Choose whether to include variation dropdowns in the add to cart column or not; list each variation on its table row, or add a ‘Read more’ button linking to the single product page where customers can choose their variations.
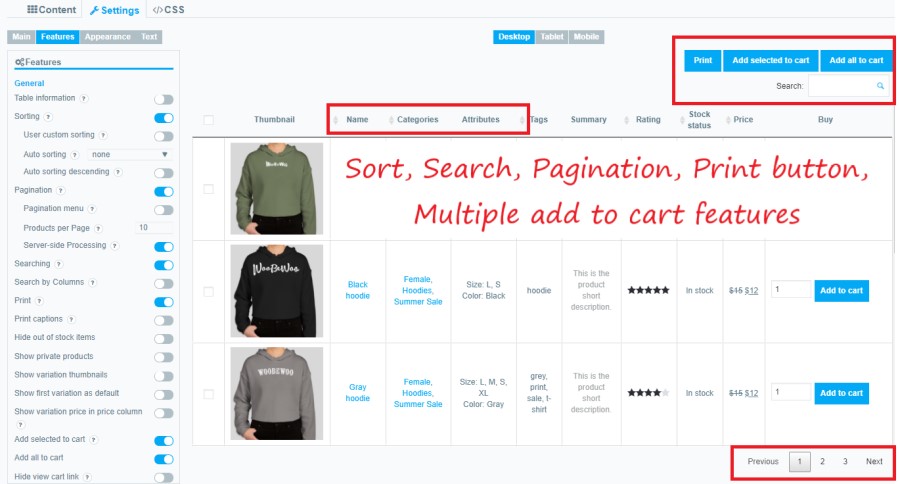
Multi-select add to cart
Increase sales by allowing customers to add multiple products and variations to their cart directly from your product list page. Use the standard Add to Cart button, multi-select checkboxes, Add All to cart, or all features together. Show or hide the quantity picker so that customers can choose a quantity directly in the product table.
Product Table design and “Buy” button customization
Play with settings to find your style and make your page unique with a variety of options. Match your tables with your website style: choose colors for every table element, including fonts, borders, and padding. Adjust alignments. Adjust the “Buy” button by customizing the button text, icon type, background type, size, shadow, and more.
Responsive mode
Keep the nice and proper view of your page, which is adapted to the screen dimensions and is properly displayed on any device. 4 modes are available. Choose which columns to hide when there are too many to fit on the page.
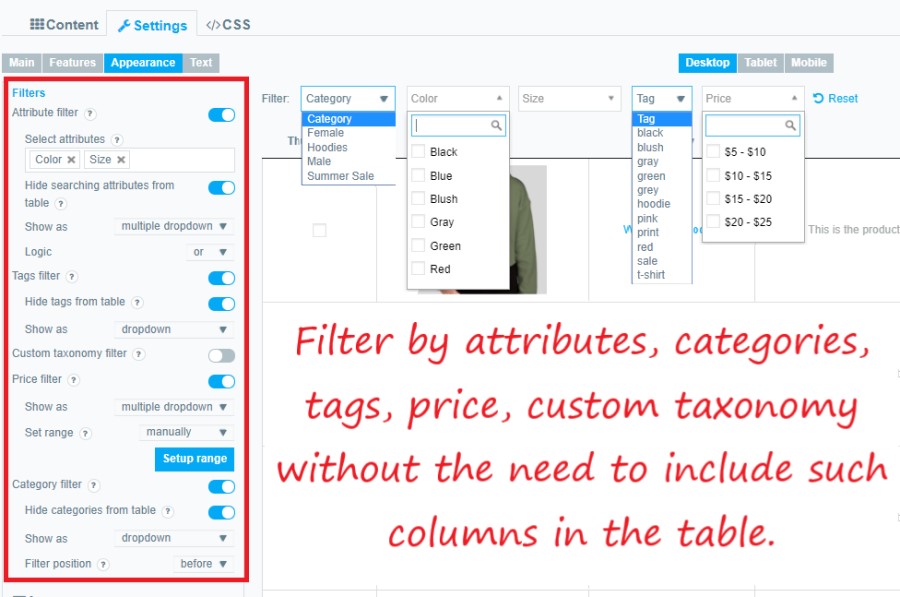
Filter category, tags, attributes, price, and custom taxonomy Product Table has set-in filters for category, tags, attributes, price, and custom taxonomy, which can be added like a drop-down menu above the table with single and multiple select.
Easy to set up and customize
Create responsive product tables of the selected items automatically without any special skills and publish your product list in a few minutes.
Select options in the pop-up Now for products with variations, instead of the “add to cart” button, you will see a button to select options, after clicking it your customers will have a chance to choose variations in a pop-up window. While simple products will keep the familiar “Add to cart” button unchanged.
Pro features
If you want to create a convenient, unique and stylish store, the goal of which is to become a new brand with satisfied customers and conversion above all norms, then you definitely need the PRO version with all its wide functional advantages.
All the benefits of the PRO version can be explored here.
It’s perfect for product Product catalogs, Price List, Order forms, and more.
First, you should install it. Then, to create the first Data Table you need:
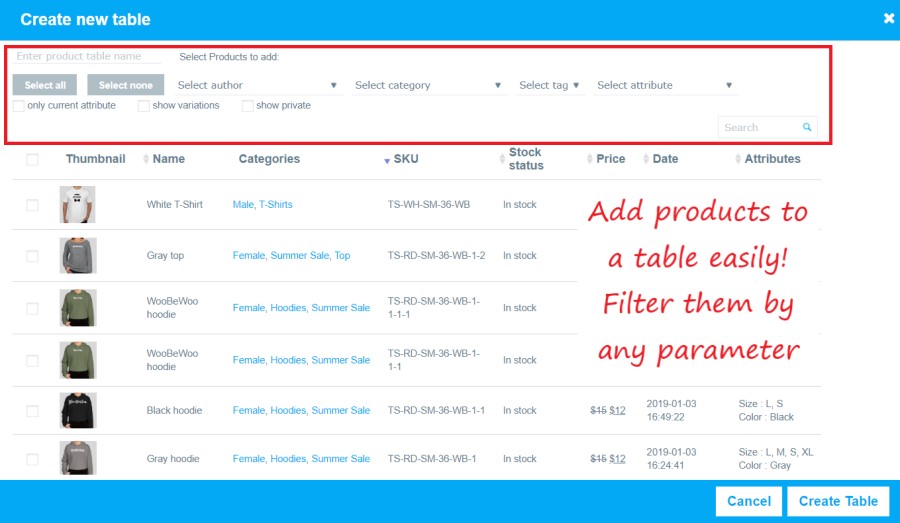
1. Click “Add new table”
2. Enter the title of the table. Click “OK”.
3. Select the necessary products and add them to Manage Table Content.
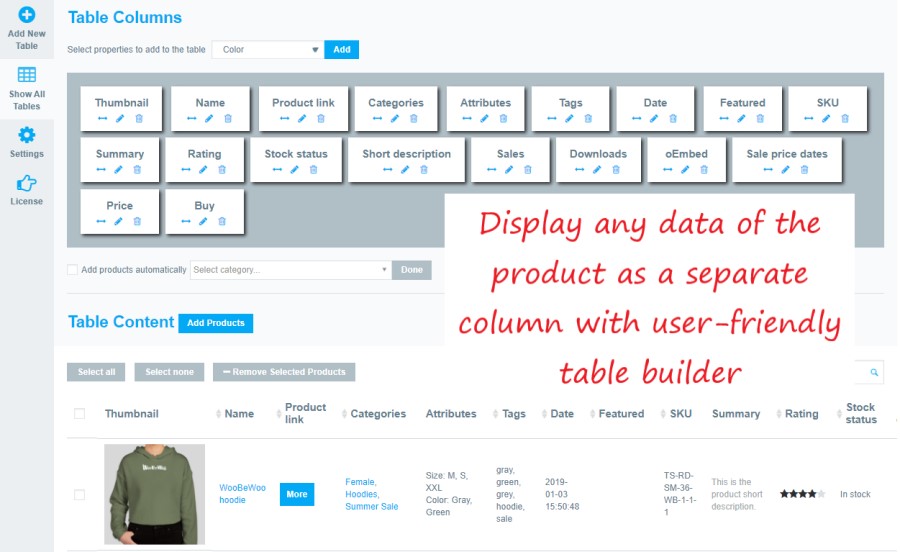
4. Select and add columns to the table: Name, Thumbnails, Categories, Featured, Price, Stock Quantity, Date, SKU, Rating, Stock status, Attribute, Summary, Buy button.
5. Add WooCommerce Product Table to the site content using code: table shortcode and table PHP code.
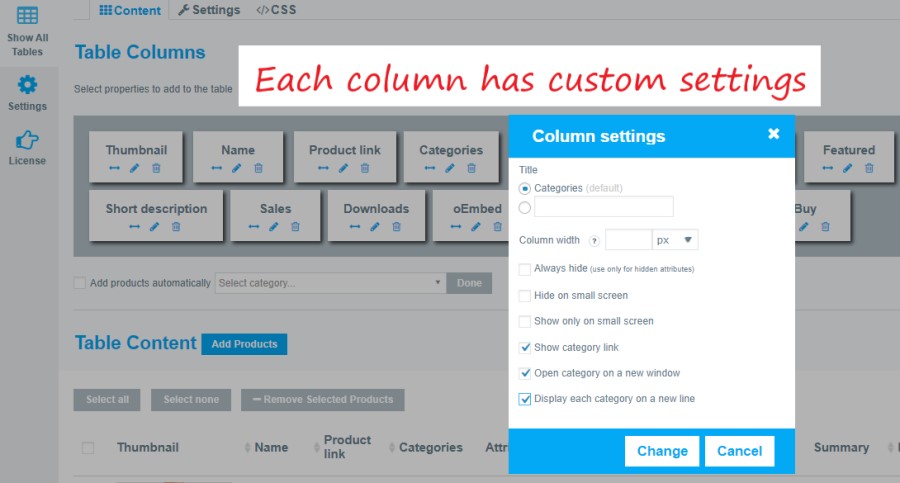
The product table includes the following columns: Name, Thumbnails, Categories, Featured, Price, Color, Size, Customizable, Date, SKU, Rating, Stock status, Attribute, Summary, Buy button. You can make your custom column if you click an edit icon and change a title.
The plugin uses the product data already created by WooCommerce itself. This means that you can add products to WooCommerce manually or import them using a CSV/XML import plugin, and they will display in the product table.
All information about the Main table settings and options you can find in our tutorial.
What is Responsive mode?
The responsive mode is the practice of designing a website that provides a nice and proper view, adapts to the screen dimensions, and works properly on a range of different devices PC desktops, mobile phones, tablets.
Responsive mode is the practice of designing a website that provides a nice and proper view, adapts to the screen dimensions, and works properly on a range of different devices PC desktops, mobile phones, tablets. The plugin provides 4 different modes of Responsive design according to your needs: Standard, Automatic column hiding, Horizontal scroll, and Disable Responsivity mode. More info you can find here in the article Responsive mode.
How to add a Product Table to a page
To add a product table go to the Product Table Plugin and use shortcodes from the list of tables or copy shortcode above the main tabs.
There are available Table Shortcode and PHP code.
Copy Shortcode and paste it to your website content, then Product Table plugin will display the table you created on the appropriate post/page using settings you tuned in this table.
Table PHP code can be inserted at any place of the page code to display exactly in this place, for example in the header or footer of the page. Besides, it can be inserted in the code of template of the theme to display on all pages.
How to add custom fields to the table?
To add the custom field to the product table, you need to follow these steps:
First, you need to create the custom field that you will use to add the data in the Advanced Custom Fields plugin (free).
Move to the Custom fields and click “Add New Field Group”
Make sure you select the ‘Products’ post type. This is essential to make the custom field appear on the Add/Edit screen for your products.
Press “Add Field” and add the label, field name, and select the type field do you need. You can add any type of fields: text, link, image, oEmbed, file, WYSIWYG editor, etc.
Once you added any type of field, it will appear on the product page.
Move to the Products and click on “Add new/edit the Product.
Scroll down to the created custom files and add the data link, picture, code, etc and update/publish a product page.
Use the next instructions to display it as a column in the table:
Move to the Product table (pro version have to be active) and create or edit the table.
Add the product with this custom field to the table. Use the searching or sorting for better navigation.
Then, add the column with a custom field.
Save a table. You can display a table with any type of field you added to the product.
How to add custom taxonomies to the table?
Create custom taxonomies quite easily using Custom Post Type UI that is fully compatible with the WooCommerce Product Table. With the help of taxonomies, you can store and show extra product data. So, they are designed to store re-usable information that can be used to group and filter products. You can also use taxonomies to filter products using the WooCommerce Product Table plugin.
Follow this step by step tutorial to create taxonomies, add them to the product and display in the table.
How to add a Multiple add to cart option to a Product table?
You need to add a buy property. To do this:
* Click on the Content
* Select Set Table Properties
* Choose and add Buy property.
2. Navigate to Settings -> Features. Then, you will see a list of available options, find and check the “Multiple add to cart” button. Click on the Save button.
Multiple add to cart option is the most beneficial for small and low-cost items. Some more information about Multiple add to cart usage you can find it here.
How to add products to the product table?
The plugin uses the product data already created by WooCommerce itself. This means that you can add products to WooCommerce manually or import them using a CSV/XML import plugin, and they will display in the product table. In this tutorial, you can find an instruction how to add a product to WooCommerce
How to create an order form?
Order form enables users to quickly scan and compare all your products. Also, it changes how products are displayed in your store.
First of all, the order form lists multiple products all on top of each other in contrast to the standard WooCommerce store, where each good takes up a relatively large amount of space. Such product displays allow customers to quickly see all the important features before they buy it.
Look at detailed instruction Step by step: how to create add an order form to the WooCommerce store.