With support as WooCommerce serial generator for your sale, tickets and on your WooCommerce PDF Invoices
You can create and generate serials and codes …
| Author: | Saso Nikolov (profile at wordpress.org) |
| WordPress version required: | |
| WordPress version tested: | 6.5.2 |
| Plugin version: | 2.3.1 |
| Added to WordPress repository: | 05-08-2022 |
| Last updated: | 30-04-2024 |
| Rating, %: | 100 |
| Rated by: | 17 |
| Plugin URI: | https://vollstart.de/event-tickets-with-ticke... |
| Total downloads: | 31 033 |
| Active installs: | 1 000+ |
 Click to start download |
|
Selling event or party tickets, member entrance with any expiration date, multipass tickets, family tickets and more. Selling different kind of tickets and redeeming them was never so easy.
Optional create your own ticket look and feel with the ticket designer. The built-in anti-double-redeem-protection protects you for fake tickets beeing used.
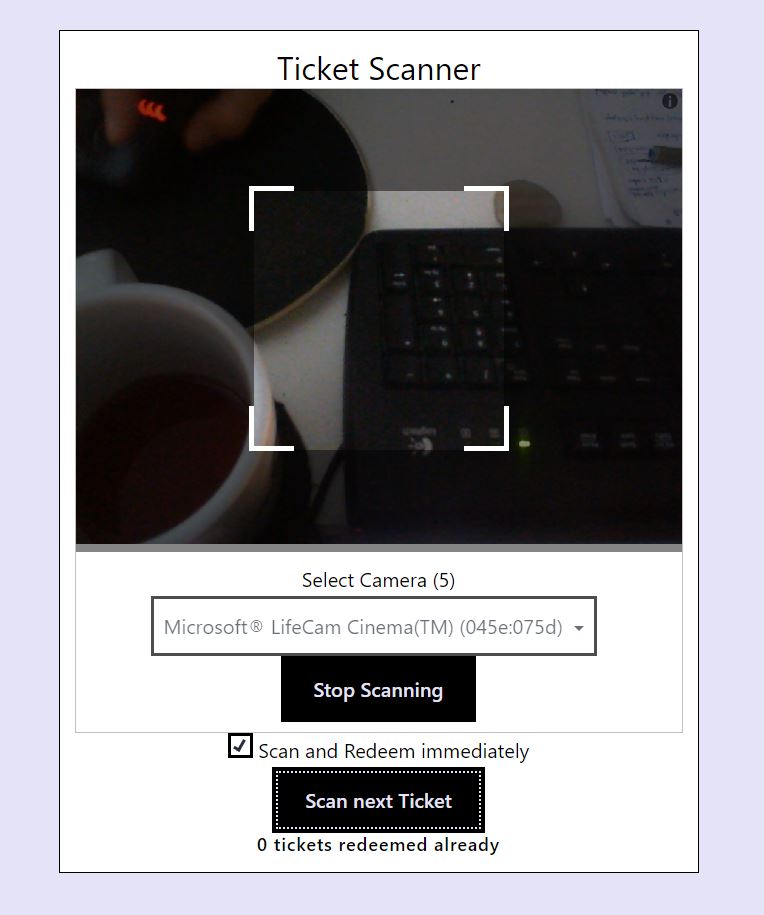
Use the built-in browser-based ticket scanner or your own ticket scanner. Hand out badges as PDF to your customers and much more.
Sell tickets for your event or party and redeem the ticket at the entrance with the free Tickets with WooCommerce plugin, from the team behind the Serial Code Validator in WordPress.
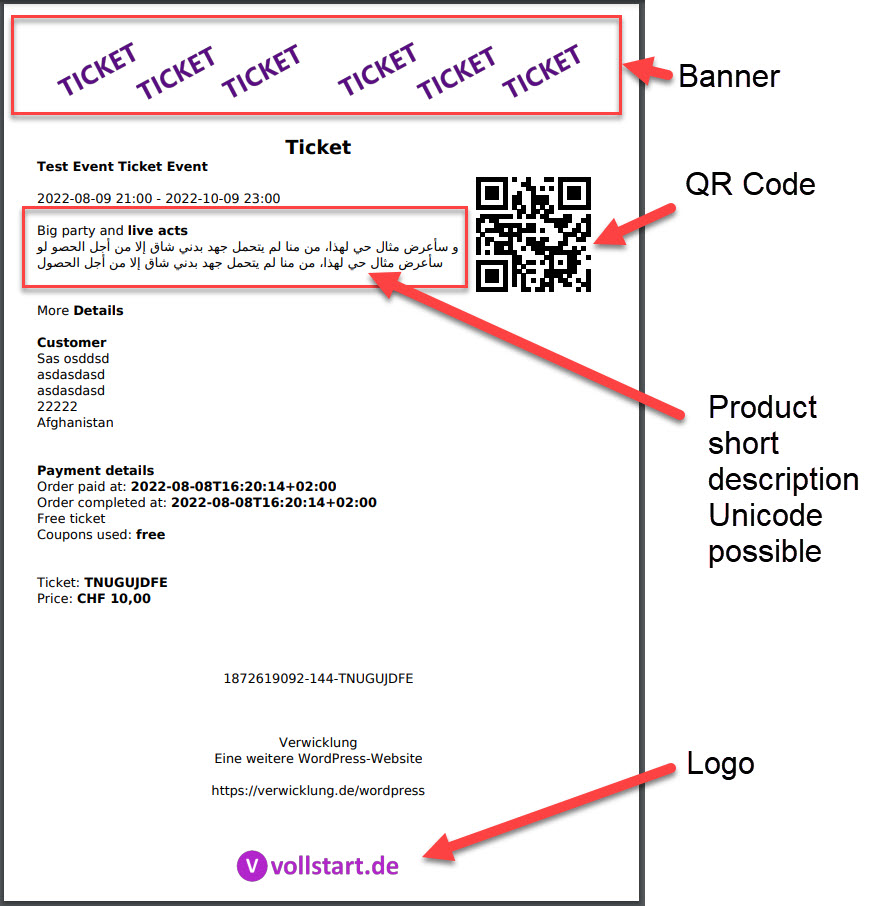
You can make your tickets look unique by adding a banner, logo and background image. The same applies also for the event or party flyer.
You can offer event badges for your event. So your customer can wear them during the event. With the badge editor you can controll the look and fell.
The QR code on the ticket can be customized, so that you can use your own ticket scanner and software if needed.
Your third party solution can be informed once a ticket is redeemed by a webhook.
You can give other person access to your ticket scanner with Auth Token System.
This plugin makes it easy to sell tickets and redeem them at the event location entrance for you in-person or virtual events. It integrates easely with your WooCommerce products.
Install the plugin and set your products to be a event ticket product. That’s it.
The plugin will generate a secure ticket number and add them to the mail to your clients. It will also generate a PDF with the ticket information and QR code. The built-in ticket scanner allows you and your team to redeem the tickets by scanning the QR-code. You can also use an external keyboard scanner by using the text input field on the ticket scanner page.
You can even import your own ticket numbers, but it will generate them also on the fly. The freedom is in your hands.
The best is to try it out. So many options. Don’t be shy, give it a try – you have nothing to loose ????
Shop: Sell event and party tickets with your normal products. The plugin will create the ticket number on the fly or use unused ticket numbers from your ticket number list for each sold item.
Validation of ticket numbers: You customer can validate a ticket number on your page. The ticket number generator gives you a flexible pattern to generate ticket numbers upfront. You can also import your existing codes.
Validation of tickets: You customer will get a link to a detail page and a PDF for each sold ticket.
Build your own stolen ticket number database: Support your customer and yourself to protect stolen ticket numbers to be sold or used to others. Mark reported ticket numbers as stolen and let others check the ticket numbers with the ticket number validator.
How can you setup the ticket numbers?
The ticket numbers will be generated by the plugin automatically, if you do not set up ticket numbers upfront.
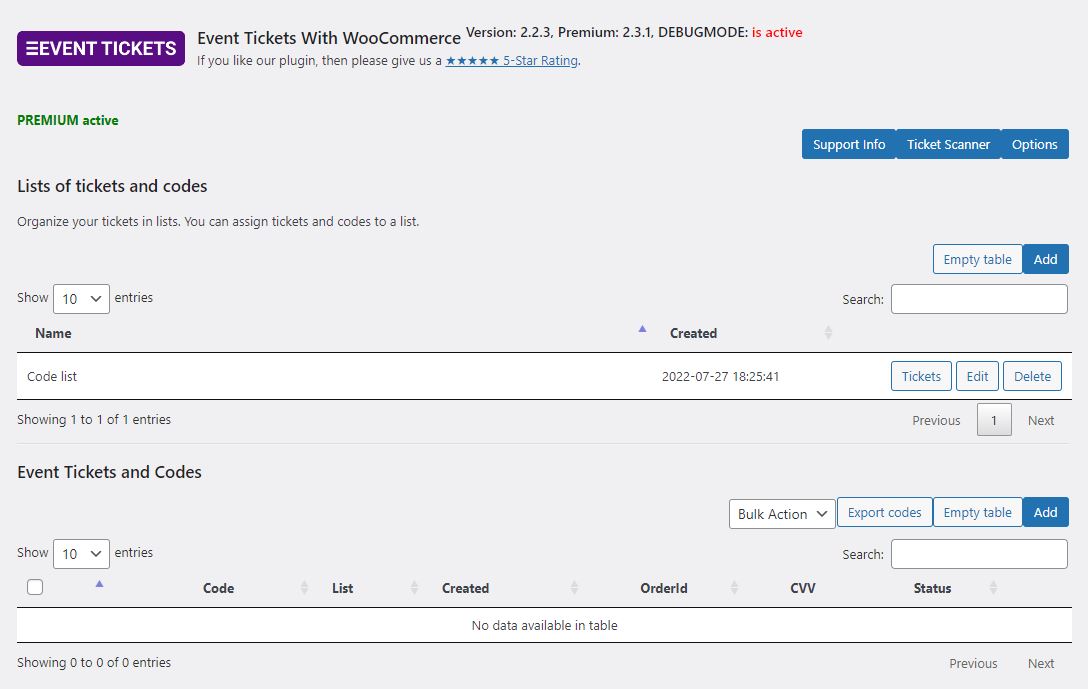
You can enter your ticket numbers within the WP admin area in the ticket number section (a new menu point in the wordpress amdin area).
You can generate your own ticket numbers manually using the ticket number generator or import existing ticket numbers.
And you are also able to add your own ticket numbers by just entering them to the generated ticket numbers below the ticket number generator.
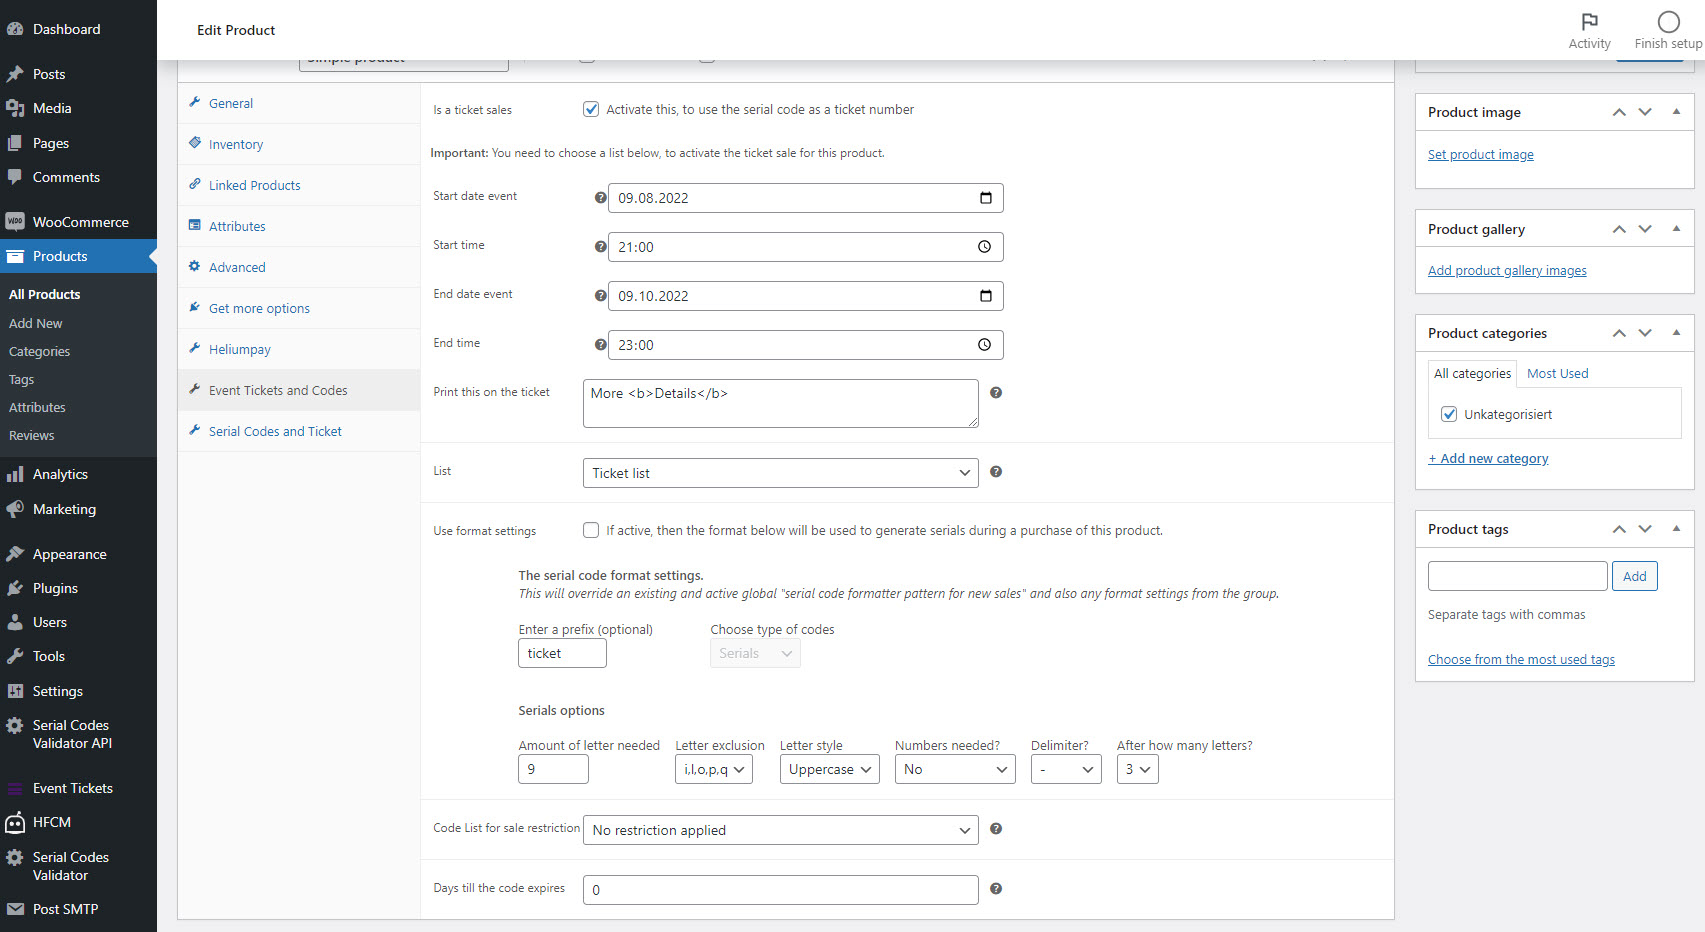
If needed you can assign the ticket (numbers) to a list which helps you to organize the tickets. The ticket list need to be assigned to a WooCommerce product.
Create one or more ticket lists to use the WooCommerce functionality.
Create bundle products – determine how many ticket numbers should be created with the sale of one product.
How the ticket number works
You define your look and feel for your ticket numbers. The generated ticket numbers will be unique. After you are satisfied with the generated ticket numbers, you can start the adding step.
The ticket adding step will check if the ticket number is unique on the server before adding it.
If the ticket number exists already on the server, it will not be added.
The ticket number generator provides a lot of features:
- Ticket number prefix – you can enter a fixed prefix to each ticket number
- Length of ticket number
- Only letters
- Uppercase, Lowercase or both
- Exclusion of letters that are easy to missread (i,l,o,q,p)
- Delimiter possible: [None, -, :, SPACE] – you decide after how many letters within the ticket number
- CVV code generation (only numbers)
Yes, this is a fork of the serial code validator plugin. We decided to make it an own plugin out of it. So to add more and more features that are not related to serial codes but to event tickets.
Features
At the bottom of this page you will find a complete list of all features.
- Sell event tickets as PDF with WooCommerce
- Single entrance, mulitpass, family pass, member card with expiration date and more
- Add QR, tickets, badges, additional PDF pages to the purchase order emails.
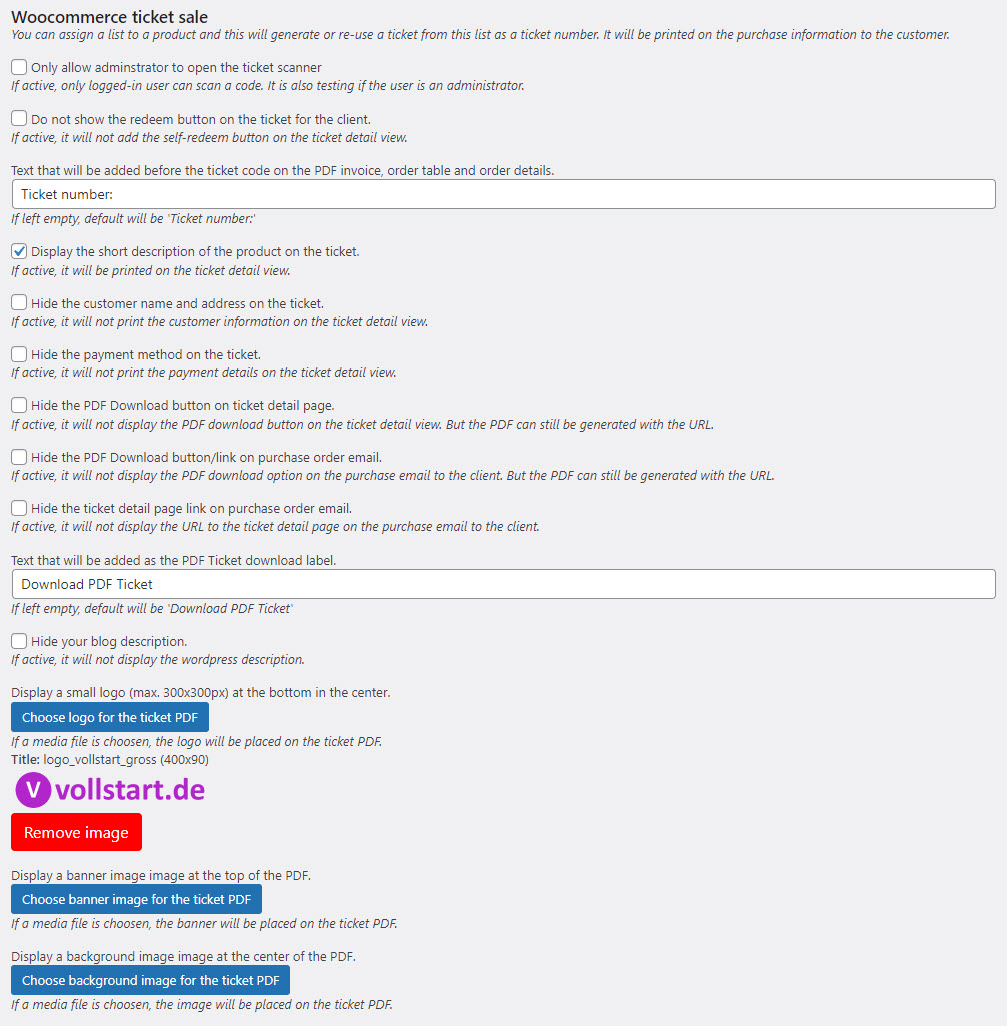
- Download PDF of ticket to print it as a badge for your customers
- Attach your own PDF to the ticket PDF (will be added as additional pages)
- Also for professional usage – use your QR and barcode scanner to verify the tickets
- WooCommerce product variants supported
- Generate flyer for your party or event
- Redeem event tickets at the entrance using the included ticket scanner page (mobile ready)
- Add ICS calendar file or a ticket to the purhcase email and ticket detail page
- Store WooCommerce orderid, itemid and productid to a ticket that was generated or used for a product sale
- You can now set a unique ticket number format for all WooCommerce product that are using a ticket number
- You can now set the ticket number format directly also on the WooCommerce product detail page if needed
- Use your codes to restrict purchases that allow a purchase of this product only if the buyer has a code for it (purchase allowance code)
- Add your own messages for the ticket number validation form for your customers
- Add your own message for the “product stolen” validation message
- Disable the validation form for not logged in wordpress user
- User can register to a ticket (with the wordpress user id if needed) after the ticket number is checked – this makes your code one-time usable
- Display registered user information of a ticket number during the validation if you need this
- One time check can have a maximum check amount based on ticket list or based on the global settings
- The user can be forwared (redirected) to an URL after the ticket number was checked – to show more details
- Webhooks – you can inform other systems about ticket redeemed status and validation steps
- Display assigned tickets to your user with a shortcode [sasoEventTickets_code]
- Add images to the ticket (header, background and Footer)
- Adopt font size for the PDF ticket
- Forcing responsive design for the ticket scanner for better experience
- Allow multiple redeem times for multi usage tickets
- Ticket badge designer for maximum control of the look and feel
GETTING STARTED
A Quick start is shown in this video.
A good first start is to open the event ticket admin area and create a list first, if not already done or if you do not want to use the default ticket list.
Go to your WooCommerce product and activate the ticket sale option and set the list.
Check out all the possible options in the event ticket admin area to understand, how to tweak your usages of plugin.
Optional: Then add your ticket number by importing (add button at the ticket table) or assign the ticket list to your products.
Optional: If you need a validation form for your users, to check the ticket number, then please add the shortcode [sasoEventTicketsValidator] to a page.
Steps to start
- Go to the admin area and click on menu “Event Tickets”.
- Click on button “Add” next to the heading “List”.
- Go to your “ticket” product and set the option with in the product settings “Event Tickets”
To scan the QR code of the sold tickets at the entrance: - Go to the admin area and click on menu “Event Tickets”.
- Click on the button “Ticket Scanner” at the top area
- Scan tickets and redeem them
Try it out first, before you go Premium! “Here you can find the premium plugin”.
Build your own Stolen products database
You can set the status of a ticket number to be marked as stolen. This way you can offer your customers a way to report a stolen product. Other buyers of used products can validate the ticket number on your website and will be notified with a “Product is stolen” warning.
This could increase sales and help reducing theft of your products.
The check behaviour will be like “inactive codes” but with the stolen message. You can change the stolen message within the options area of the serial code admin.
Protection with CVV
You can set a code verification value (CVV) to protect your tickets. The validation check will ask the user to enter both for a valid check.
That way you increase the security of your ticket numbers and prevent stealing the numbers (If you are able hide the CVV on your packaging).
If you use a CVV on a ticket number, then the user will be asked to enter this CVV too during the validation. If the CVV on your ticket number is not set or empty it will be ignored and your customer is not asked for it.
Woocommerce support for auto-generating tickets
Supports version 6+
You can use this plugin to auto-generate tickets and codes for your woocommerce products
* Create a code list
* Go to your WooCommerce product and edit the product which should receive a ticket
* Go to your WooCommerce product and edit the product which should receive a code – if needed
* Click on “Event Tickets” in the attribute area of your product
* Choose the “List” that will be used for this product
Everytime this product is sold, it will get a new generated ticket number/code or use an unused one within your list (This need to be activated within the option settings). The new code will be added to the code list you set on your WooCommerce product and to the product sale too.
If the sold product quantity in the order is more than 1, then a ticket number/code will be generated for each element. The code will be generated after the purchase. In case of a refund the code will be recovered and marked as unused, so that it can be reused.
E.g.: Your customer bought 2 of the same product within one order, then 2 tickets will be generated and stored to the product item within this order.
WooCommerce Ticket Features
- Automatically create and assign tickets for physical products and digital products
- Recover tickets assigned to refunded orders
- Option to reuse the recovered tickets with the latest orders
- Automatically deliver the tickets with the complete order email
- Automatically a ticket as PDF for download and add the download link to the complete order email.
- Automatically deliver the tickets and download URL with the optional PDF invoice “WooCommerce PDF Invoices”
- Download a flyer for your event or party
WooCommerce Code Features
- Automatically create and assign codes for physical products and digital products
- Recover code assigned to refunded orders
- Option to reuse the recovered codes with the latest orders
- Automatically deliver the codes with the complete order email
- Automatically deliver the codes with the optional PDF invoice “WooCommerce PDF Invoices”
Please note:
If you exceed your limit (no limits for premium user) of the amount of possible tickets/codes, then the ticket/code added to the sold product will be a text information: “Please contact our support for the code”.
This way your business is not harmed and your customer can contact you to get a code manually. The format of the code will be 12345-12345-12345-12345 if you do not set a generation format within the options.
WooCommerce PDF Invoices support to display the ticket numbers on the PDFs
If you use “WooCommerce PDF Invoices”, then the generated ticket numbers/codes are displayed on the generated PDFs too!
The supported PDF plugin is from Ewout Fernhout.
WooCommer Ticket Sale
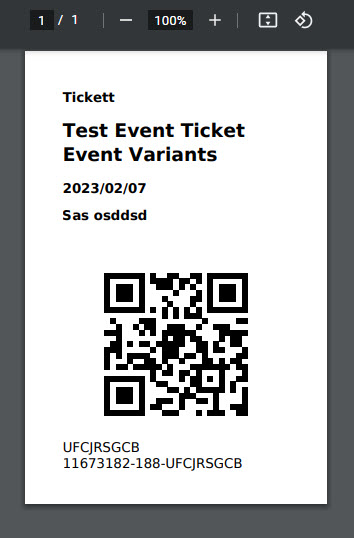
You can add a list to your product and sell tickets. The ticket will be added to the sale informations for you and your client.
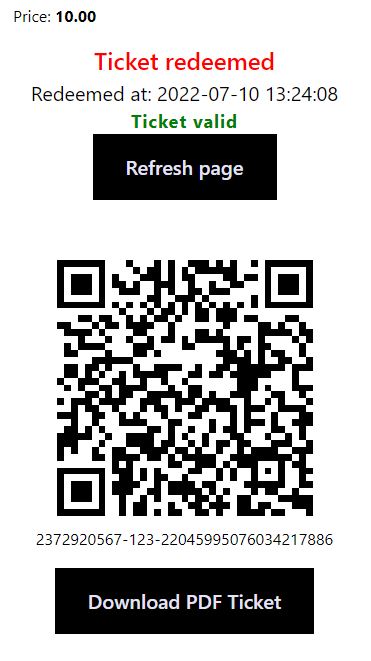
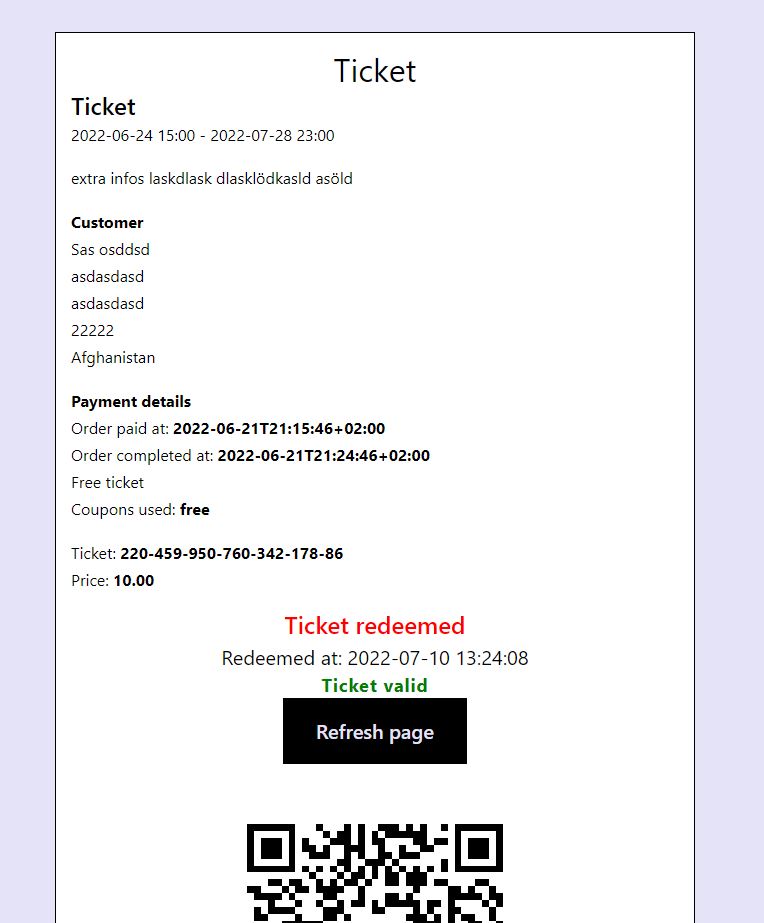
The client will also have a link to check the ticket and mark the ticket as used, only if the order is set to completed. This will mark the ticket as redeemed.
You can check the entrance by letting your customer show the confirmation page and hit on the “redeem”-button.
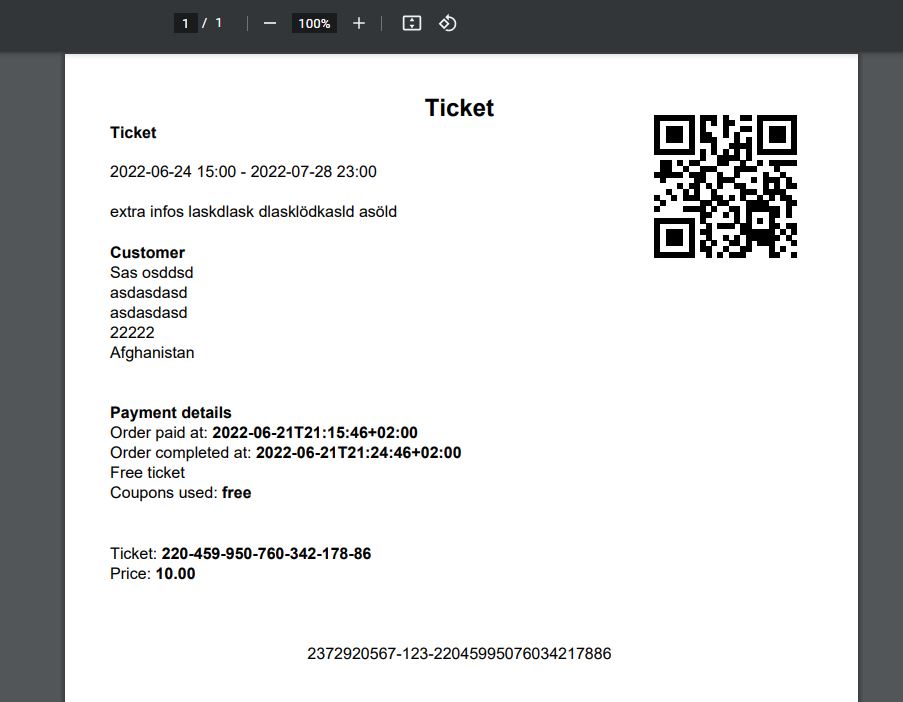
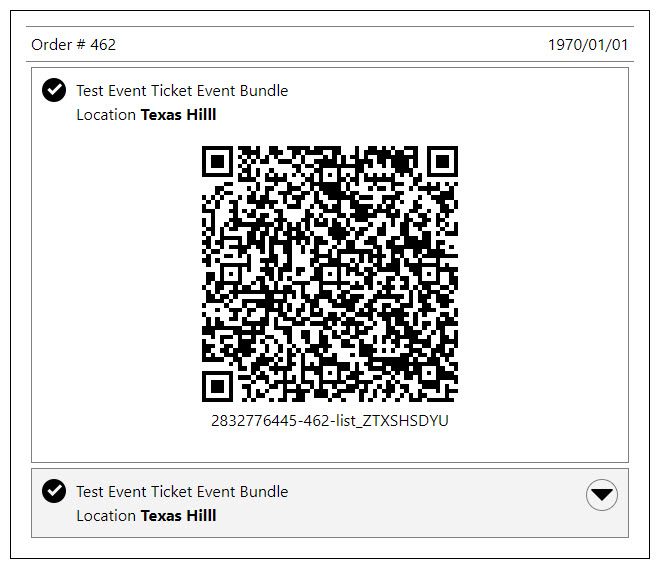
Or you scan the QR code of the ticket with the ticket scanner (included). The ticket is also available as PDF for download to your customers.
Checkout the video, how it works
Frontend
We have different frontend elements. Just to sell tickets and scan them, you do not need to add any shortcodes to your pages.
Frontend event tickets
Your customer will receive a specific URL to the ticket detail page. You can control which information to display. additional they can download the ticket as a PDF.
The ticket will contain a QR code, that can be scanned by you or your team (no loggin to WordPress needed) and redeem the ticket.
Watch the video for it
Frontent to validate the ticket number
- Use the shortcode [sasoEventTicketsValidator]
- Create a page or use an existing one and add the shortcode to the page
- The shortcode will be replaced for your users by a form to enter the ticket number and a button to validate the ticket. This allows you to surround the form with your own heading and instruction.
- Each ticket number has a display version (e.g. XYZXYZ -> XYZ-XYZ), so it is easier for your user to read the ticket number.
- The check will remove the display delimiter “-“, “:”, ” ” for the check automatically.
- So your user can enter the ticket number with or without delimiters.
If you use CVV on a code and the user enter the ticket number that requires a cvv, then your user will be ask to enter the CVV.
The user could enter the CVV immediately with the code. Separate the value with a “:”. E.g: XYZXYZ:1234.
It is possible to prefill …
Screenshots
ChangeLog