This plugin modifies the output of the popular Contact Form 7 plugin to be fully compatible with WordPress themes using the Bootstrap CSS framework – no additional styling required.
| Author: | Felix Arntz (profile at wordpress.org) |
| WordPress version required: | 3.6 |
| WordPress version tested: | 4.9.25 |
| Plugin version: | 1.4.8 |
| Added to WordPress repository: | 04-11-2014 |
| Last updated: | 24-05-2018
Warning! This plugin has not been updated in over 2 years. It may no longer be maintained or supported and may have compatibility issues when used with more recent versions of WordPress.
|
| Rating, %: | 96 |
| Rated by: | 26 |
| Plugin URI: | https://wordpress.org/plugins/bootstrap-for-c... |
| Total downloads: | 296 343 |
| Active installs: | 20 000+ |
 Click to start download |
|
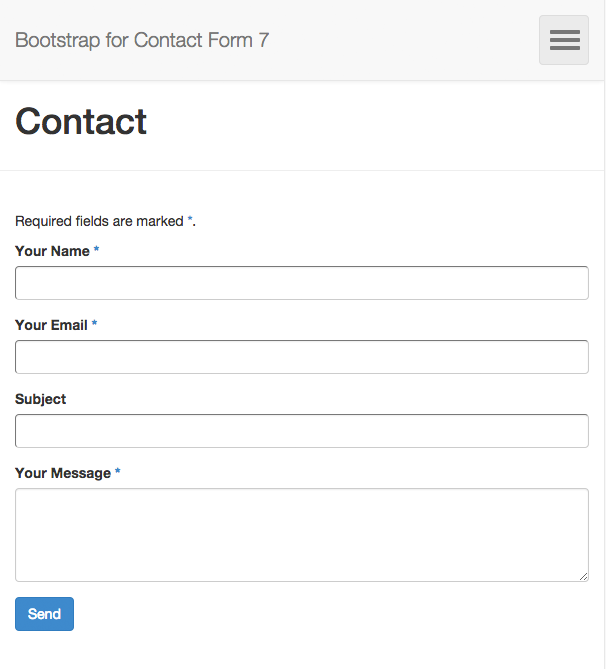
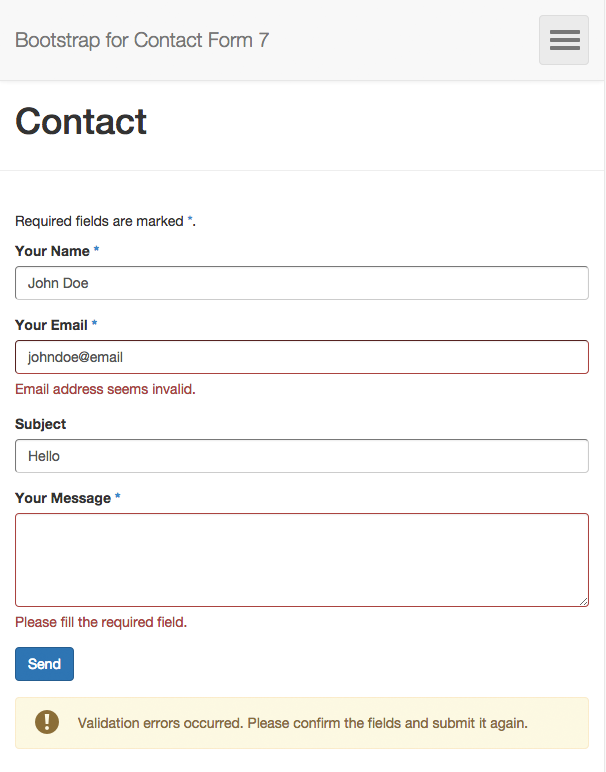
Bootstrap for Contact Form 7 modifies all the output of the popular Contact Form 7 plugin to be fully compatible with the current version 3 of the popular CSS framework Bootstrap. What this means to you as a Bootstrap user: No additional CSS rules necessary – from now on, Contact Form 7 integrates seamlessly with the overall Bootstrap design. It is even possible to use different form layouts via Contact Form 7’s “Additional Settings” tab.
This plugin is an addon to Contact Form 7.
The plugin requires Contact Form 7 to be activated, otherwise it won’t change anything. Furthermore you should be using it in conjunction with a Bootstrap-based WordPress theme, otherwise the forms might look weird (and there would be no point in using this addon anyway).
Usage
Bootstrap for Contact Form 7 does not provide additional options itself, so you can continue using Contact Form 7 (almost) the same way you did before.
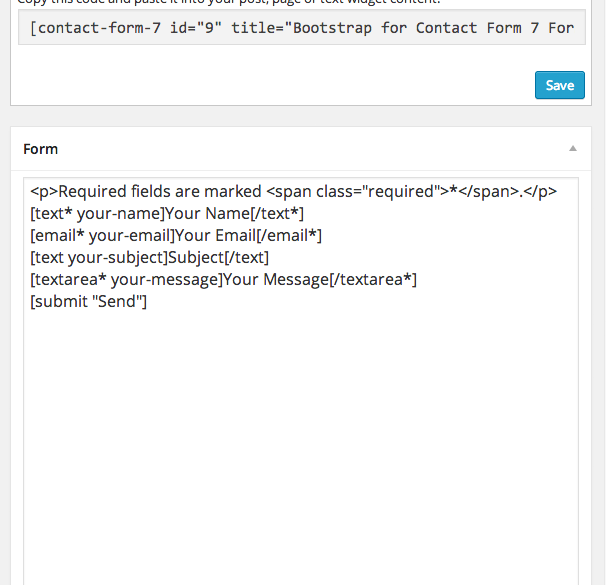
The plugin will not break your form’s appearance, however it is recommended to adjust the contact form shortcodes to achieve perfect results: Generally, you should not be using HTML tags any longer to wrap the field shortcodes. They already include the complete Bootstrap-ready markup, including displaying labels. Read the Setup Guide for a quick introduction.
Advanced Features
The plugin brings some additional useful features to enhance your forms even more:
- the form layout can be changed to a horizontal or inline one
- the form’s input size can be globally changed
- checkbox and radio groups can be displayed either one per line, inline or as Bootstrap buttons
- text inputs and textareas support Bootstrap’s input group feature to add content before or after them
- text inputs and textareas can show a character count (the [count] shortcode from Contact Form 7) inline
- the captcha input field can show the captcha image inline
- by using GET parameters in a URL to a contact form, field values can be predefined
The above features are explained in detail on the Other Notes page.
Basic Idea behind the Plugin
Lots of WordPress Themes are based on Bootstrap – and while it is the general approach to use CSS rules to style your HTML content, it is also possible the other way around – with many benefits.
When using a well-known framework which provides general styles for all the important components of a website, it can be time-consuming to apply the same styles to third-party plugins which (obviously) have not been written with a framework in mind. This is perfectly fine, but if you’re using Bootstrap for your WordPress theme, you will certainly love the fact that you do not need to write CSS rules for the Contact Form 7 plugin any longer. It will all look like Bootstrap from the beginning so that it fits into your website design. If you’re not using Bootstrap, this plugin is useless for you – but maybe you’re just having an idea how you can adjust another popular WordPress plugin to integrate with another well-written CSS framework.
Advanced Features
Additional Settings
Here you find additional settings which are part of the Bootstrap for Contact Form 7 plugin. If you want to learn more about the additional settings of the original Contact Form 7 plugin, please visit this page.
You can adjust several form properties (properties that affect an entire form, not just a single field of it) to give your forms the appearance you want. Here is a list of the properties, what they do and their possible values:
layout– adjusts the form’s layout (note that in most cases the inline form will need additional styling to look good); valid values: ‘default’, ‘inline’, ‘horizontal’; default value: ‘default’size– adjusts the size of all input fields; valid values: ‘default’, ‘small’, ‘large’; default value: ‘default’group_layout– adjusts the layout of checkbox and radio groups; valid values: ‘default’, ‘inline’, ‘buttons’; default value: ‘default’group_type– adjusts the color of checkbox and radio groups with buttons layout; valid values: ‘default’, ‘primary’, ‘success’, ‘info’, ‘warning’, ‘danger’; default value: ‘default’submit_size– adjusts the size of the submit button; valid values: ‘default’, ‘small’, ‘large’ or an empty string to force it to have the size defined in thesizeform property; default value is an empty stringsubmit_type– adjusts the color of the submit button; valid values: ‘default’, ‘primary’, ‘success’, ‘info’, ‘warning’, ‘danger’; default value: ‘primary’required_html– adjusts the HTML output to append to required fields’ labels; valid values: any HTML output; default value:<span class="required">*</span>grid_columns– allows you to override the total grid column count of Bootstrap (you might only need to adjust this if you’re using a custom version of Bootstrap); valid values: any integer greater than 1; default value: 12label_width– adjusts the form’s label width (applies only to horizontal layout); valid values: any integer between 1 and the value ofgrid_columnsminus 1; default value: 3breakpoint– adjusts the responsive breakpoint (applies only to horizontal layout); valid values: ‘xs’, ‘sm’, ‘md’, ‘lg’; default value: ‘sm’
There are four methods to adjust the above properties: The easiest one is to use the “Additional Settings” tab when editing a form in Contact Form 7 and insert any property and its desired value there, one per line. For example:
layout:horizontal
size:large
group_layout:inline
Alternatively you can use the filter cf7bs_form_{{FORM_ID}}_properties where {{FORM_ID}} must be replaced by the ID of the form you would like to modify (you find that number in the overall form’s shortcode). An array of all the properties and their values is passed to that function so that you can easily adjust them. Example (in this case we would adjust the contact form with the ID 3):
function my_custom_form_properties( $properties ) {
    $properties['layout'] = 'horizontal';
    $properties['size'] = 'large';
    $properties['group_layout'] = 'inline';
    return $properties;
}
add_filter( 'cf7bs_form_3_properties', 'my_custom_form_properties' );
The third way does something slightly different from the other two since it does not change a specific form’s properties, but the default properties for all forms. To do that, you should use the filter cf7bs_default_form_properties which works exactly like the other filter mentioned above.
The fourth method is different from the others as it allows to override the form settings on a per-field basis. You can add any of the setting names plus its intended value as a shortcode attribute for any field to make this field behave differently from the form’s setting. This can be especially helpful if you need to create advanced form layouts like when you need multiple fields on the same line. For example, you could do the following to display two fields in one row, even though the form’s layout is set to ‘default’:
<div class="form-group row">
    <div class="col-md-6"><label for="user-first-name">First Name</label>[text user_first_name id:user-first-name layout:none][/text]</div>
    <div class="col-md-6"><label for="user-last-name">Last Name</label>[text user_last_name id:user-last-name layout:none][/text]</div>
</div>
Note that the custom form filter takes precedence over the properties defined in the admin, while the default filter is just used as fallback.
Input Groups
All textual input fields support the input group feature that Bootstrap provides. To use it, add a shortcode-like construct (almost, but it has to use curly braces instead) into the content of any text / email / url / tel input shortcode. Example:
[text twitter-username]{input_before}@{/input_before}Your Twitter Handle[/text]
Note that the input_before and input_after can also be added to textareas. In this case, the content will be displayed directly above or below the textarea respectively.
Submit Button Alignment
The submit button can be aligned left, center or right to fit your form’s desired appearance. Simply provide an align option with either ‘left’, ‘center’ or ‘right’ as value. Example:
[submit align:right "Send"]
Inline Character Count
Contact Form 7 provides a [count] shortcode that renders a number indicating how many characters have been entered or how many characters are remaining in a specific input field. Using it on its own looks kind of ugly though. But guess what, you can adjust that too by adding an option include_count to any text / email / url / tel / textarea input. You can optionally specify a value for that option as well which can consist of the positioning (‘before’ or ‘after’) and the count direction (‘up’ or ‘down’) of the counter. Just as a reminder, when choosing ‘down’, make sure you give the input element a maximum length, otherwise there is no point in having that counter. Example:
[text your-text maxlength:80 include_count:after:down]Your Text[/text]
By the way, have you read the information about input groups above? You can combine those with the character count (because just seeing a number without any additional information might confuse your site’s visitors). The following example will show a message like ‘433 characters left’ after the field:
[textarea your-text maxlength:500 include_count:after:down input_after:characters---left]Your Text[/textarea]
Inline Captcha Image
If you’ve been using Contact Form 7 together with the Really Simple CAPTCHA plugin, you are probably aware of the [captchar] (captcha input field) and [captchac] (captcha image) shortcodes it provides. You can still use them independently, but it probably looks nicer to have the captcha image show up inline, right beside its input field. To accomplish this, remove the [captchac] shortcode completely and instead add a new option include_captchac to the [captchar] shortcode. You can optionally give this option a value (either ‘before’ or ‘after’) to mark the location where the image should show up. Example:
[captchar your-captcha include_captchac:before]Captcha[/captchar]
Custom Form URLs
You can add GET parameters to populate your forms with custom initial values by simply using the field name as parameter’s key and the desired value as the parameter’s value. This works with checkboxes, date fields, number fields, select fields, all text fields and textareas. The easiest way to create such a URL is to use the plugin’s function cf7bs_add_get_parameter() where you provide parameters similarly to the WordPress Core function add_query_arg. Example:
$my_custom_url = cf7bs_add_get_parameter( array(
    'your-name'     => 'John Doe',
    'your-email'    => 'johndoe@example.com',
    'your-subject'  => 'Support Request',
), 'http://www.example.com/my-custom-form/' );
Filter Field Arguments
As of version 1.2.3, field arguments for every single field can be filtered, which allows you to basically modify anything you like. The filters you need to hook your function into have the following structure cf7bs_form_{{FORM_ID}}_field_{{FIELD_BASETYPE}}_{{FIELD_NAME}}_properties. Yep, it’s a long filter name, but it is necessary so that you can filter in the most detailed way possible. When using one of the filters, replace {{FORM_ID}} with the ID of the form, {{FIELD_BASETYPE}} with the type of the field you need to adjust (be sure to not include the asterisks here!) and {{FIELD_NAME}} with the name of the field. The function should accept one argument, an array of parameters. For an overview about the available parameters, please check the plugin’s source code.
Unsupported functionality
While the plugin tries to support as many features as possible from the original Contact Form 7 (in combination with adding new ones!), not everything is and can be supported.
There are two things in particular which are explicitly not supported:
- the
sizeoption on all input fields (Bootstrap form elements scale automatically, so we do not need a custom size for those) - the
label_firstoption on checkbox and radio fields (Bootstrap natively only supports checkboxes and radio buttons where the label is displayed after them)
If you discover any other Contact Form 7 feature than the above two which is not supported by Bootstrap for Contact Form 7, you can raise an issue or submit a support request.
Screenshots
FAQ
ChangeLog


