Easily move content and code between WordPress sites. Pull your site's DB to a dev site, push new code to a staging site, etc.
| Author: | Mark Rowatt Anderson (profile at wordpress.org) |
| WordPress version required: | 3.3.1 |
| WordPress version tested: | 3.6.1 |
| Plugin version: | 0.4.2 |
| Added to WordPress repository: | 05-07-2012 |
| Last updated: | 09-09-2013
Warning! This plugin has not been updated in over 2 years. It may no longer be maintained or supported and may have compatibility issues when used with more recent versions of WordPress.
|
| Rating, %: | 94 |
| Rated by: | 15 |
| Plugin URI: | http://rowatt.com/sitepush |
| Total downloads: | 9 837 |
| Active installs: | 50+ |
 Click to start download |
|
SitePush is a WordPress plugin which allows you to have multiple versions of your WordPress site, so you can edit, develop, test without any risk to your main, live site. It’s great for developers, designers and editors… anyone who wants to be able to test changes to a site before it is visible to the world. For example:-
- you can easily move content between sites. For example, make extensive edits on a private staging site, and then push changes all at once to your live site. Or, easily pull copy of your live database into your development site so you are developing against the latest content.
- test new themes and plugins, and only push them to your live site once they are configured and working as you want.
- upgrade WordPress, themes and plugins on a private site so you can test that nothing breaks before upgrading your live site. Sure you take backups before any upgrades (right?), but it’s a pain doing a full backup and an even bigger pain restoring from a backup.
- easily make small (and big!) code changes on your development site, test and easily push new code to a live site. Great for dealing with clients who want “just one more thing”.
Although SitePush installation is a bit more involved than a typical plugin, once set up it runs with minimal effort and can be easily used by non-tech authors & editors. Site admins can easily configure SitePush so that non-admins can only push content (i.e. posts/pages, comments and uploads) and to a restricted set of sites.
Please read the Installation instructions before you install SitePush – it’s not a normal download and activate type of plugin installation
Support
SitePush is under active development and I will do my best to provide fixes to problems. The latest general releases are always available through the WordPress Plugins Directory. Development code is hosted on GitHub, so you may find more frequent releases there.
For general questions, please post on the WordPress forums with the tag sitepush. For bug reports or if you wish to suggest patches or fixes, please go to the SitePush GitHub repository.
If you have any problems with SitePush, it would be helpful if you could add
define('SITEPUSH_DEBUG',TRUE);
to your wp-config.php file, and include the output which will now be displayed at the top of the SitePush options screen.
Disclaimer Although SitePush has been well tested and is used on production web sites, it moves files and database content between sites which could break things. Use of SitePush is at your own risk! Please make sure you have adequate backups and if you do find any problems please report them.
Roadmap
There are a number of areas which could be improved. Currently on the roadmap:-
- improve push undo
- add support for pushing between sites on different servers
Please let me know how you would like to see SitePush evolve.
Server Setup
How to setup SitePush in a multiple vhost environment
You can run your separate versions of a site in a single vhost, or in separate vhosts. While running them all in a single vhost can be little easier to set up on some web hosts, it does not work well if different sites need any different configuration in your .htaccess file – for example if you are using a caching plugin.
If you are able to set up separate vhosts (or subdomains as some hosts call them) I recommend you do it that way.
Let’s say you want to have three versions of your site – live, test, and dev.
Set up a vhost for each site. Where they all sit on your server will depend on your hosting setup, but let’s say they are at:-
/var/www/vhosts/live/httpdocs
/var/www/vhosts/test/httpdocs
/var/www/vhosts/dev/httpdocs
You will need to create a directory to hold all the config files. If at all possible, this directory should not be web accessible. For example, it might be at:-
/var/www/sitepush/config
You will also probably want to create a directory for any backups SitePush makes, such as:-
/var/www/sitepush/backups
Finally, you will need to create a database for each of your sites. Consult the WordPress installation instructions and your web host for how to do this.
Download WordPress and unzip it into one of your sites. I normally keep WordPress in its own subdirectory, for example:-
/var/www/vhosts/live/httpdocs/wordpress
That way, the root directory stays clean, and if I install anything else outside of WordPress, there won’t be any confusion of which files belong where. You need to make a couple of changes for this setup to work – see WordPress documentation for more details. Note that for multisite installs, though, you will need to install WordPress in the root directory.
I do, however, put my wp-config.php file in the root directory (WordPress is smart enough to find it).
Next you will need to create the SitePush config files and put them in the config directory you created above. See the SitePush installation instructions for what needs to go in your sites config file and your database config file (I usually call them sites.ini.php and dbs.ini.php).
Now, copy the files from the site you just set up to your other sites, for example:-
cd /var/www/vhosts
cp -r live/httpdocs dev/httpdocs
To save a bit of disk space (at the expense of possibly messing things up between sites), you can also symlink the uploads directory between sites so there is only one copy of any media files uploaded. For example:-
cd /var/www/vhosts/dev/httpdocs/wordpress/wp-content
rmdir uploads
ln -s ../../../../live/httpdocs/wordpress/wp-content/uploads uploads
The exact paths will depend on your setup.
Finally, log into your live site, install, activate and configure SitePush, and now you are set up to easily move files and content between 3 versions of your site!
How to setup SitePush in a single vhost
You can run your separate versions of a site in a single vhost, or in separate vhosts. Depending on your web host, running them all in a single vhost can be bit easier to set up, though it does mean you need to share one .htaccess file across all versions of your site, and won’t work for WordPress Multisite setups.
If you are able to set up separate vhosts (or subdomains as some hosts call them) I recommend you do it that way, but if not, these instructions show how you can have multiple version so of your site on one vhost.
Let’s say you want to have three versions of your site – live, test, and dev.
First make sure that you can set up domain aliases on your host – so that multiple domains point to the same files. For example, you might set up:-
live.example.com
test.example.com
dev.example.com
If your host allows wildcard domain setups, so for example anything.example.com would point to your files, that would also work
Set up a subdirectory for each site. Where they all sit on your server will depend on your hosting setup, but let’s say they are at:-
/var/www/httpdocs/live
/var/www/httpdocs/test
/var/www/httpdocs/dev
You will need to create a directory to hold all the config files. If at all possible, this directory should not be web accessible. For example, it might be at:-
/var/www/sitepush/config
You will also probably want to create a directory for any backups SitePush makes, such as:-
/var/www/sitepush/backups
Download WordPress and unzip it into one of the directories for your sites. For example:-
/var/www/httpdocs/live
Follow the instructions for more installing WordPress in a subdirectory.
You should also now create a database for each of your sites. Consult the WordPress installation instructions and your web host for how to do this.
Complete any other required configuration (WordPress setup, plugin installs etc) and make sure that your site is now working properly. Don’t forget to install SitePush!
Next you need to create the SitePush config files and put them in the config directory you created above. See here readme.txt or the SitePush installation instructions for what needs to go in your sites config file and your database config file (I usually call them sites.ini.php and dbs.ini.php).
Now, copy the files from the site you just set up to your other sites, for example:-
cd /var/www/httpdocs
cp -r live dev
cp -r live test
To save a bit of disk space (at the expense of possibly messing things up between sites), you can also symlink the uploads directory between sites so there is only one copy of any media files uploaded. For example:-
cd /var/www/httpdocs/dev/wp-content
rmdir uploads
ln -s ../../live/wp-content/uploads uploads
The exact paths will depend on your setup.
Next you need to make some changes to your wp-config.php file so that it will point to the correct site files and database depending on what domain name was used. The exact details will vary depending on your setup, but you will want something like this, which should be inserted immediately above the line /* That's all, stop editing! Happy blogging. */:-
switch ( $_SERVER['SERVER_NAME'] ) {
    case 'test.example.com':
        $site_dir='test';
        define('DB_NAME', 'database_name_here');
        define('DB_USER', 'username_here');
        define('DB_PASSWORD', 'password_here');
        break;

    case 'dev.example.com':
        define('DB_NAME', 'database_name_here');
        define('DB_USER', 'username_here');
        define('DB_PASSWORD', 'password_here');
        $site_dir='dev';
        break;

    case 'www.example.com':
    case 'live.example.com':
    default:
        define('DB_NAME', 'database_name_here');
        define('DB_USER', 'username_here');
        define('DB_PASSWORD', 'password_here');
        $site_dir='live';
        break;
}
Insert whatever constant definitions are specific to a site in that section, and delete or comment them out from their original location in wp-config.
Lastly, you need to edit the last line of wp-config so it reads:-
require("./{$site_dir}/wp-blog-header.php");
You can now log into your live site, activate and configure SitePush. Once that is done, you can push everything to your other sites and you should now be able to access all three versions of your site. You are now set up to easily move files and content between 3 versions of your site!
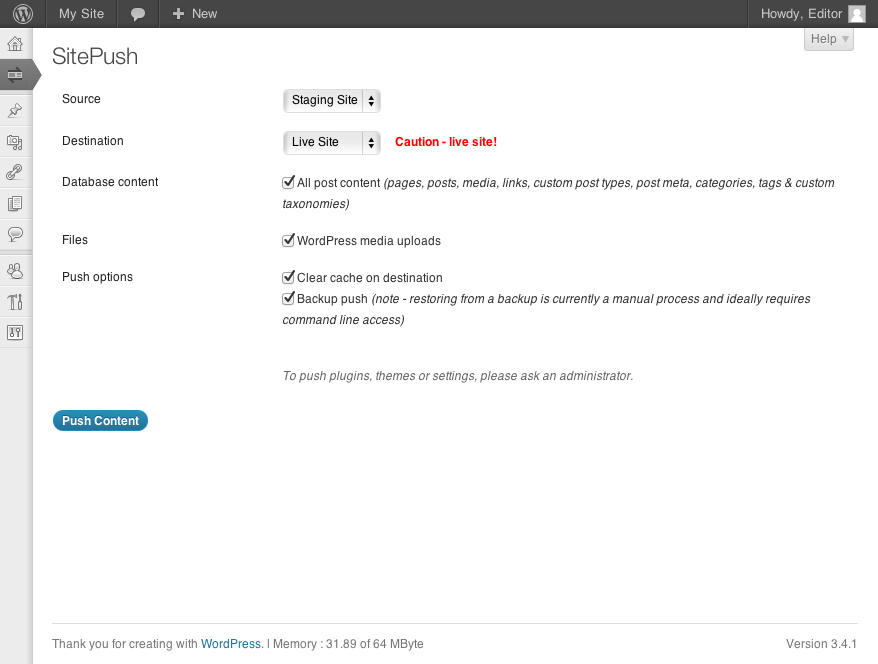
Screenshots
FAQ


ChangeLog