Control what goes into the favorite actions menu in WordPress 2.7+
| Author: | Matt Harzewski (redwall_hp) (profile at wordpress.org) |
| WordPress version required: | 2.7 |
| WordPress version tested: | 2.8 |
| Plugin version: | 1.0.0 |
| Added to WordPress repository: | 02-01-2009 |
| Last updated: | 13-06-2009
Warning! This plugin has not been updated in over 2 years. It may no longer be maintained or supported and may have compatibility issues when used with more recent versions of WordPress.
|
| Rating, %: | 0 |
| Rated by: | 0 |
| Plugin URI: | http://www.webmaster-source.com/wordpress-fav... |
| Total downloads: | 5 149 |
| Active installs: | 20+ |
 Click to start download |
|
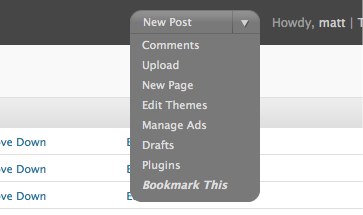
Starting in WordPress 2.7, a menu is included in the upper-right corner of the Admin. The menu, by default, includes links allowing easy access to frequently used pages in the Admin. But there isn’t an option to add your own links!
Favorites Menu Manager allows you unfettered customization of that dropdown menu. You can easily add your own links, remove existing ones, and put them in the order you desire. Customizations are stored on a per-user basis, so each user can have their own collection of frequently used links.
Usage
Visit the Users -> Edit Favorites Menu page of the Admin to add, remove, and reorder items in the Favorite Actions menu.
The easiest way to add a new item is to visit the page you wish to add, then choose the “Bookmark This” option from the menu. You will be taken to a Manage Favorites Menu screen, where you can adjust the name of the menu item before pressing the button to accept.
Be careful of the Remove links when managing the menu. The item will be removed immediately. You will NOT be prompted.
Upgrading
The easiest way to update the plugin is to use the automatic plugin upgrader found in all versions of WordPress since 2.5.x. Just visit the Plugins page and if a new version is available, click the link to update the plugin. WordPress will take care of the rest.
Manual Upgrade:
1. Download the latest version of the plugin from the repository.
2. Deactivate plugin
3. Upload updated files
4. Reactivate plugin
Version history
- Version 1.0
Screenshots
FAQ