
A WordPress plugin to disable your website front-end and display a message to
your visitors while still allowing back-end access for administrators an
| Author: | Jimmy K. (profile at wordpress.org) |
| WordPress version required: | 3.0.1 |
| WordPress version tested: | 4.1 |
| Plugin version: | 1.3.1 |
| Added to WordPress repository: | 25-01-2014 |
| Last updated: | 29-12-2014
Warning! This plugin has not been updated in over 2 years. It may no longer be maintained or supported and may have compatibility issues when used with more recent versions of WordPress.
|
| Rating, %: | 100 |
| Rated by: | 24 |
| Plugin URI: | http://www.nintencode.com |
| Total downloads: | 103 079 |
| Active installs: | 5 000+ |

Click to start download
|
A plugin to temporarily disable your website front-end and display a message
to your visitors while still allowing back-end access. This plugin can be
enabled or disabled with one click and also supports using your own custom
HTML/CSS output for the splash page so you can make it as simple or as custom
as you need it to be.
This plugin is especially useful if you need to temporarily make your site
unavailable to your visitors. For example, you're working on a new blog or
website and you want to show a temporary "coming soon" page to your visitors
while you're working on it; or you're fixing major bugs that would disrupt the
user experience and need to make the front-end temporarily unavailable; or any
other reason that you would need to make your website temporarily unavailable.
This plugin can be configured to allow admin users (you) to still be able to
view the front-end while the splash page is enabled. If other users need to be
able to review the site, you can enable authenticated users and/or specific IP
addresses to be able to bypass the splash page as well.
Common uses for this plugin:
- Displaying a splash page while you develop your blog or website
- Temporarily making your site unavailable to visitors while you fix bugs, etc
- Disabling a site if a client refuses to pay (we've all been there)
Screenshots
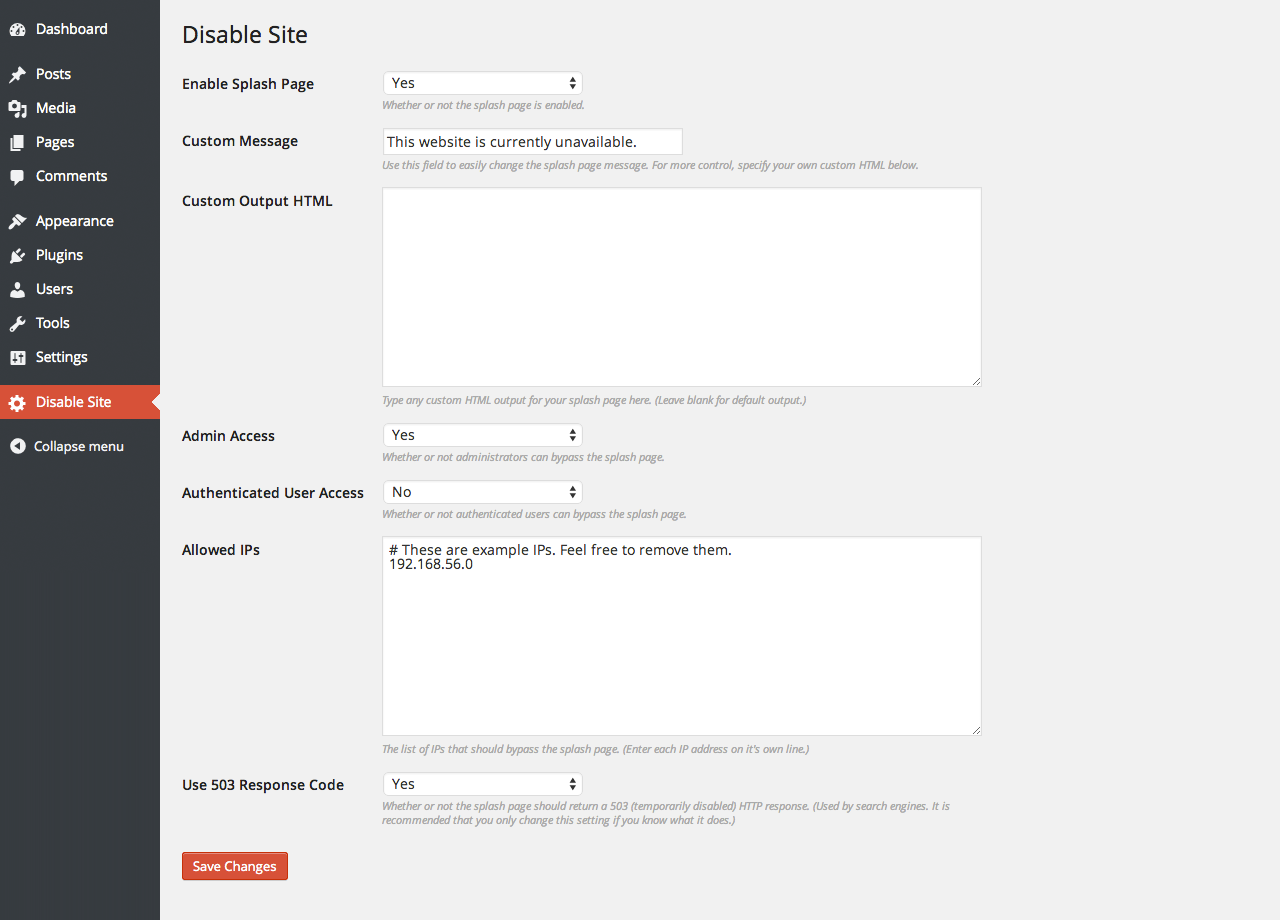
The admin interface showing the configuration page for this plugin.

The default splash page.

An example of a customized splash page.
Installation Instructions
- Upload the
disable-site plugin directory to the /wp-content/plugins/
directory on your server.
- Activate the plugin through the
Plugins menu in WordPress.
- Configure the plugin.
- Profit!
How do I change the default splash page message?
Simply navigate to the configuration page for the plugin and set the textfield
labeled Custom Message to your custom message.
How do I specify my own HTML for the splash page?
There are two ways to do this: via the configuration page for the plugin, or
in code. To specify your own HTML via the configuration page, navigate to the
configuration page and paste your HTML and/or CSS into the field labeled Custom
HTML Output.
To specify your own HTML in code, paste the following in your functions.php
file and customize it to suit your needs.
if ($disable_site_plugin) {
    $disable_site_plugin->set_output_html(
        'This is an example of <strong>custom</strong> HTML output.'
    );
}
Can my splash page include HTML, CSS, and JavaScript?
Yes it can! You can use any HTML, CSS, and/or JavaScript that you need.
How do I disable the splash page?
Simply navigate to the configuration page for the plugin and set the dropdown
labeled Enable Splash Page to No.
How do I allow administrators to bypass the splash page?
Simply navigate to the configuration page for the plugin and set the dropdown
labeled Admin Access to Yes.
How do I allow authenticated users to bypass the splash page?
Simply navigate to the configuration page for the plugin and set the dropdown
labeled Authenticated User Access to Yes.
How do I allow users from specific IP addresses to bypass the splash page?
Simply navigate to the configuration page for the plugin and enter each IP
address into the textarea labeled Allowed IPs (each one on it’s own line).
ChangeLog
0.1
The initial release of this plugin.
0.2
Cleaned everything up for release.
1.1
Updated version number for the official initial release.
1.2
Added custom message field and IP address filtering.
1.2.1
Added 503 response header per @pembo13’s suggestion.
1.3.1
Refactored to use appropriate WordPress coding standards.